Bonding and Grounding M-Learning Solution Documentation
Table of Contents
E. Looking Around the Environment
G. Moving / Rotating Equipment
J. Isolating / Energizing Lines
T. Wearing High Voltage Rubber Gloves
II. Using the Administrative Facilities
A. Starting the Administration System
J. Changing Administrative Password
L. Exporting to Excel Spreadsheets
III. Troubleshooting Guide / FAQ
A. Why Do I Get an Error Message When Trying To Install the Setup.msi File?
B. How Do I Start the Simulator?
C. Why Can’t I Run Testing Mode in the Simulator?
D. Why Can’t I See Shadows in the Simulator On This Machine?
E. Why is the Simulator Slow and Jerky?
F. What is the Username and Password for the Administrative System?
G. How Do I Uninstall The Software?
I. Using the Simulator
A. Starting the Simulator
The simulator can be executed by clicking on the start button on the taskbar, and following this sequence of menu items: Start->All Programs->3DInternet->Bonding and Grounding>Bonding and Grounding Simulator
The simulator can run in English mode or French mode.
B. Selecting Scenarios
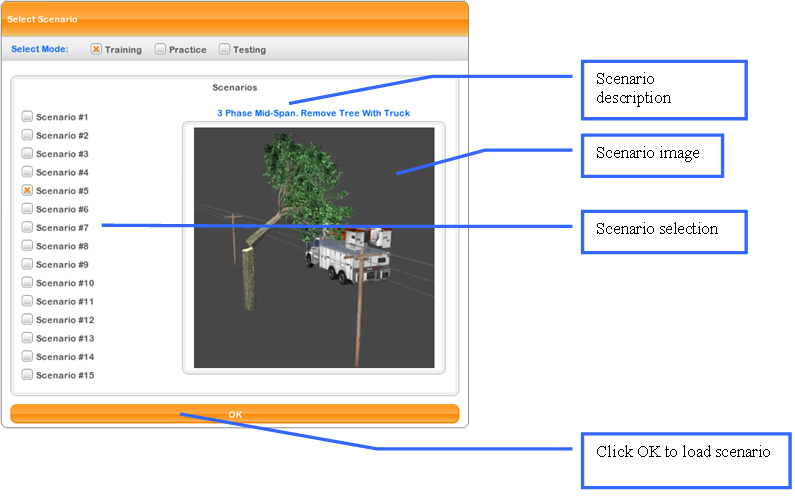
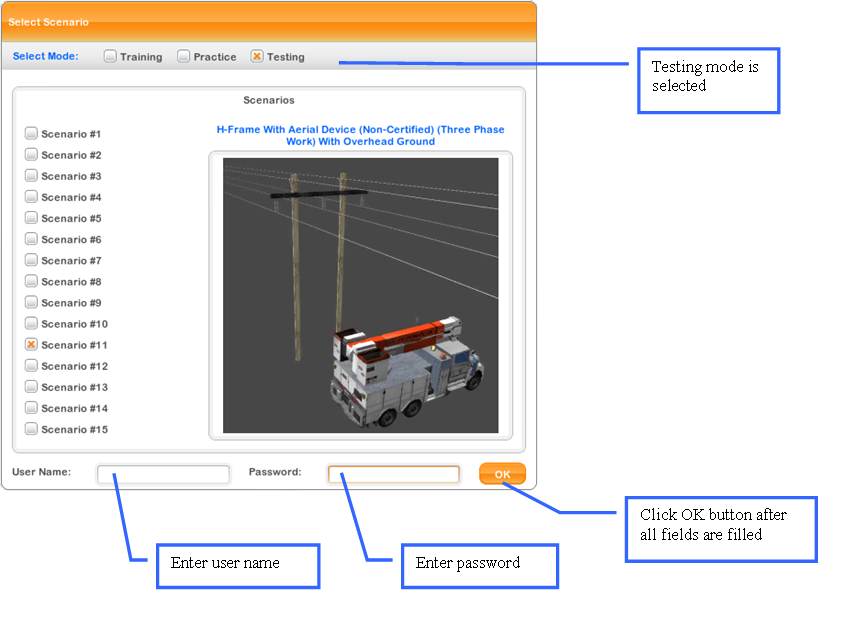
Once the appropriate language has been selected, the screen below will be displayed. All available scenarios appear on the left. Clicking a scenario results in the description and image in the middle of the screen changing to reflect the selection made. Each scenario except those that are implemented as demos only, can operate in three modes – training, practice and testing. Training and practice modes do not require user authentication. If testing mode is selected, a user name and password will have to be entered. Click the “OK” button to load the scenario.
C. Modes of Operation
All scenarios, with the exception of those implemented as demos only, have required procedures and can operate in three modes – training, practice and testing. Only testing mode requires a user to log in.
· Training Mode:
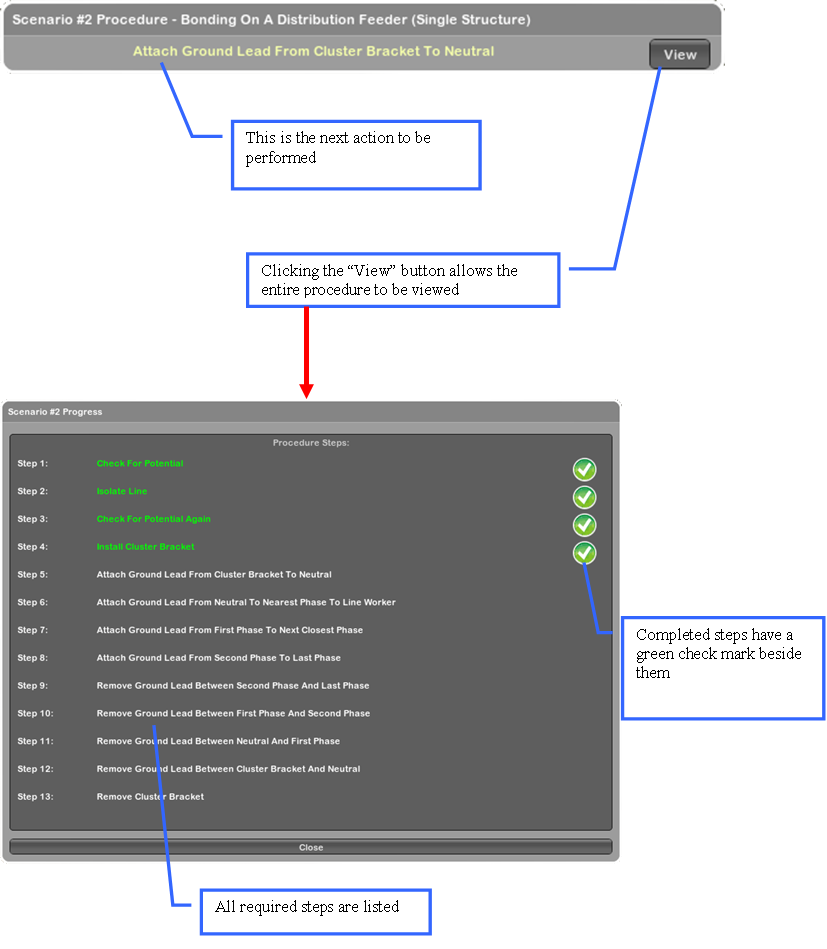
In this mode the user is instructed on each action to perform and when. The procedure window located at the top area of the screen prompts the user on exactly what is required. The “View” button inside the procedure window triggers the display of the entire procedure. It shows which actions have been completed, and which actions have yet to be performed.
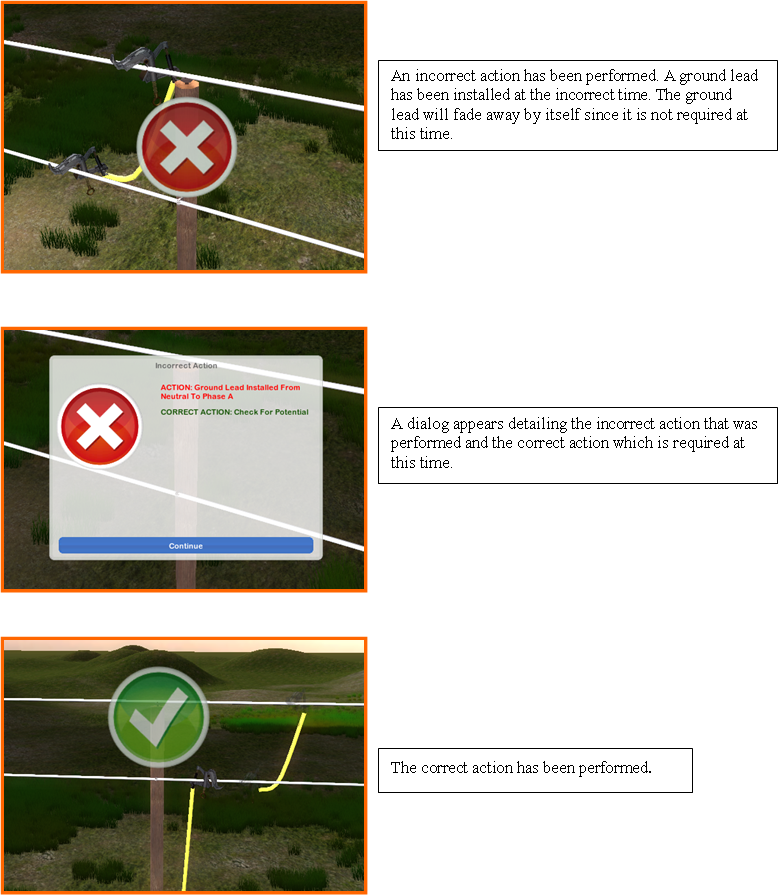
If an incorrect action is performed, the user is notified immediately and the incorrect action is undone before his / her eyes. Correct actions result in a floating green check mark; incorrect actions result in a floating red X.
· Practice Mode:
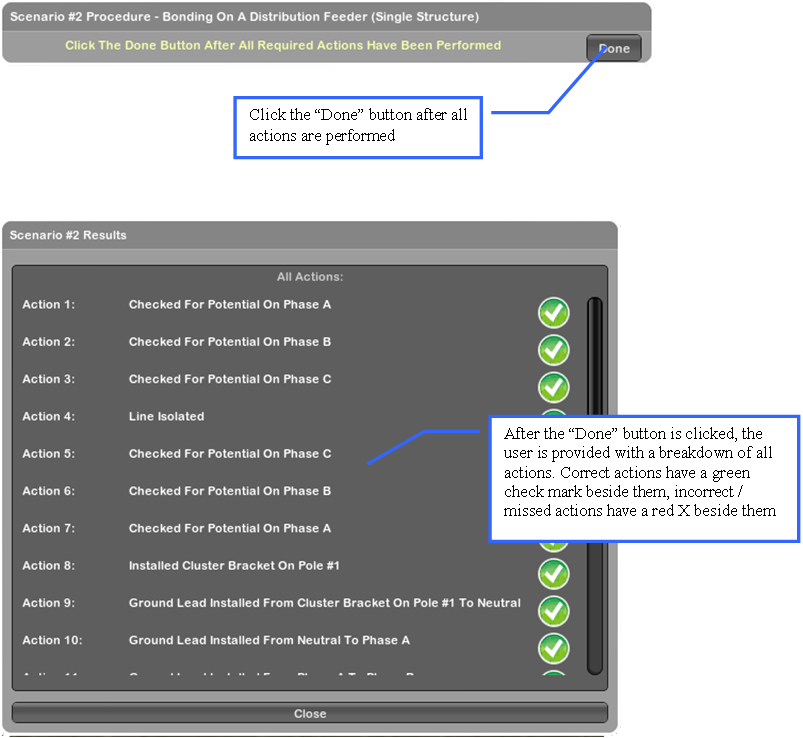
In practice mode, the user is not prompted on what actions need to be performed next. It is expected that the user is fully aware of the required procedure, and is ready to perform the required actions in the correct order. Incorrect actions are not undone. It is the user’s responsibility to signal to the simulator when they feel the job task has been completed. This is accomplished by clicking the “Done” button. A breakdown of user actions will be displayed on-screen as well as how many mistakes were made if any.
· Testing Mode:
Testing mode is identical to practice mode with the exception that all actions are routed to the Administrative System for later viewing by an administrator. To facilitate this, users are required to log in when running any scenario in this mode.
D. Basic Avatar Navigation
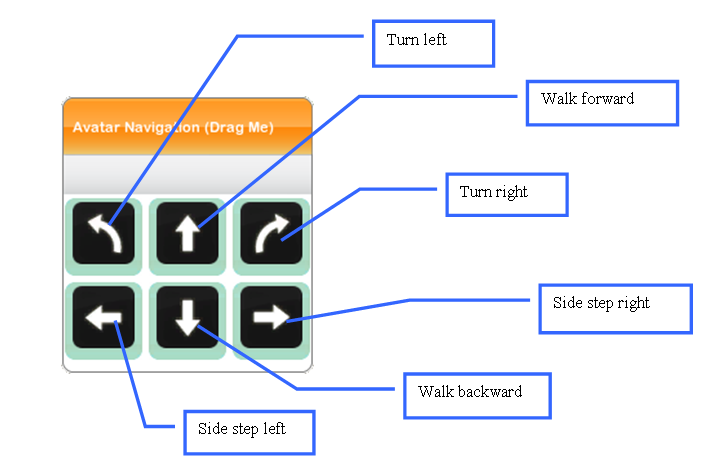
The “Avatar Navigation” window is used to manipulate the position and orientation of the worker. The worker can walk forward, walk backward, turn left, turn right, side step left, and side step right. The window contains five buttons which can be used to control the worker. To use them, move the mouse cursor over the required button in the window then press and hold down the left mouse button. The worker will become activated, and will articulate the appropriate animation. Un-pressing the left mouse button will cancel the animation, and the worker will remain idle.
E. Looking Around the Environment
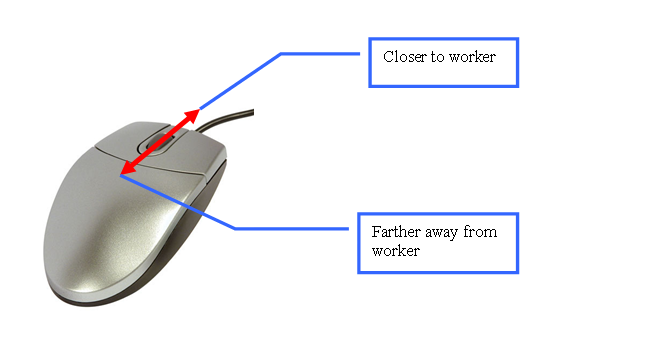
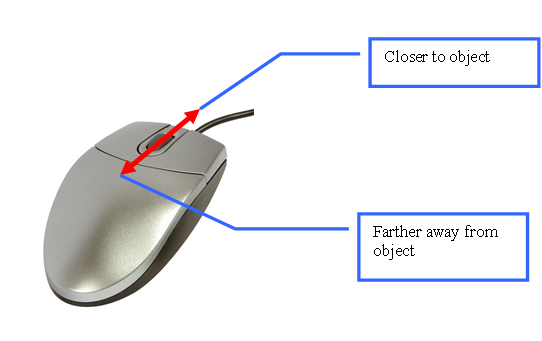
What is visualized in the virtual environment is determined by the position and orientation of the “virtual camera”. The virtual camera is analogous to a real camera on the set of a movie. Initially the virtual camera is situated directly behind and above the worker. Using the scroll-wheel of the mouse, this virtual camera can be moved closer or farther away from the worker.
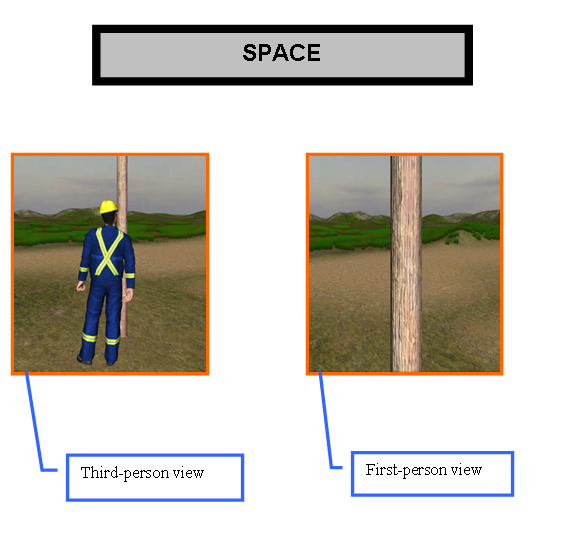
The virtual camera is using what is known as a “third-person” view by “looking” at the worker. Holding down the SPACE bar will cause the virtual camera to shift into a “first-person” view. In this view, the point of observation is through the worker’s eyes. Once in this mode, the user can “look” around the virtual environment by keeping the SPACE bar pressed and moving the mouse.
F. Camera View Modes
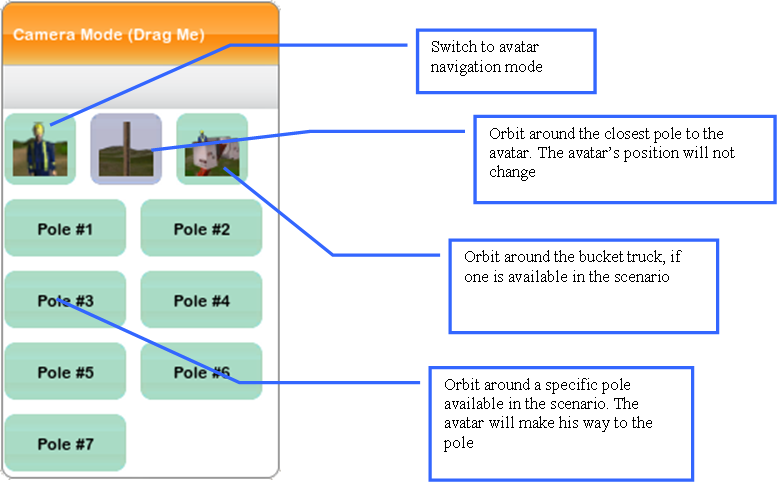
The position and orientation of the “virtual camera” on-screen determines exactly what is visualized. There are several ways to control the camera and its object of focus. By default, the camera starts off “orbiting” one of the poles in the selected scenario. This can be changed so that the camera follows the movement of the avatar, or changes its object of focus to the bucket truck if one is available in the scenario, or changes its object of focus to another pole in the scenario. In the screen-shot below, seven poles are available; the virtual camera can orbit around any one of them.
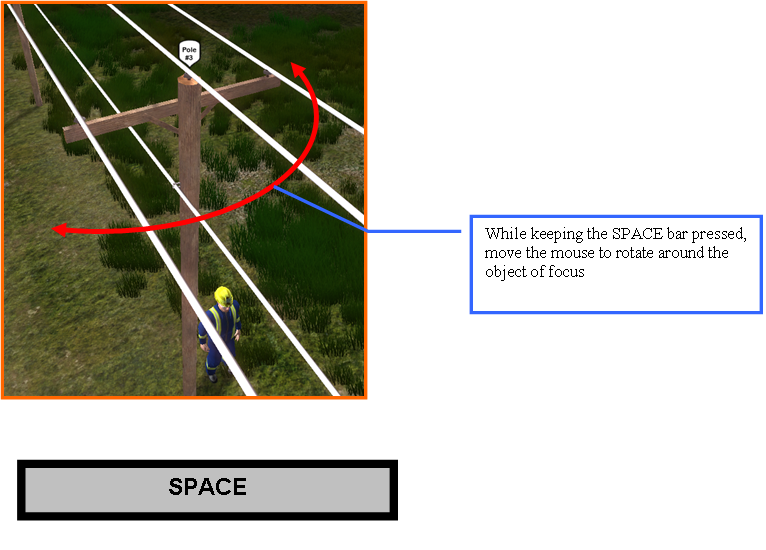
Observe the screen-shot below. The virtual camera is set to orbit around pole #3. To rotate the camera around the object, hold down the SPACE bar and move the mouse. To move closer or farther away from the object, use the mouse scroll-wheel.
G. Moving / Rotating Equipment
The following items can be moved and rotated inside a scenario:
· Ground clamp
· Cluster bracket
· Tie-off rope
The icons inside the equipment control window are used to determine how the above are manipulated. See the diagram below:
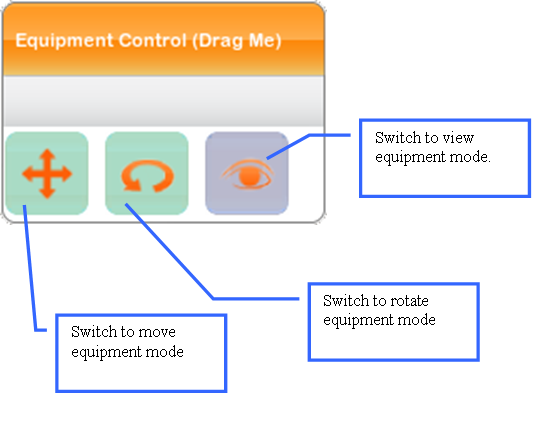
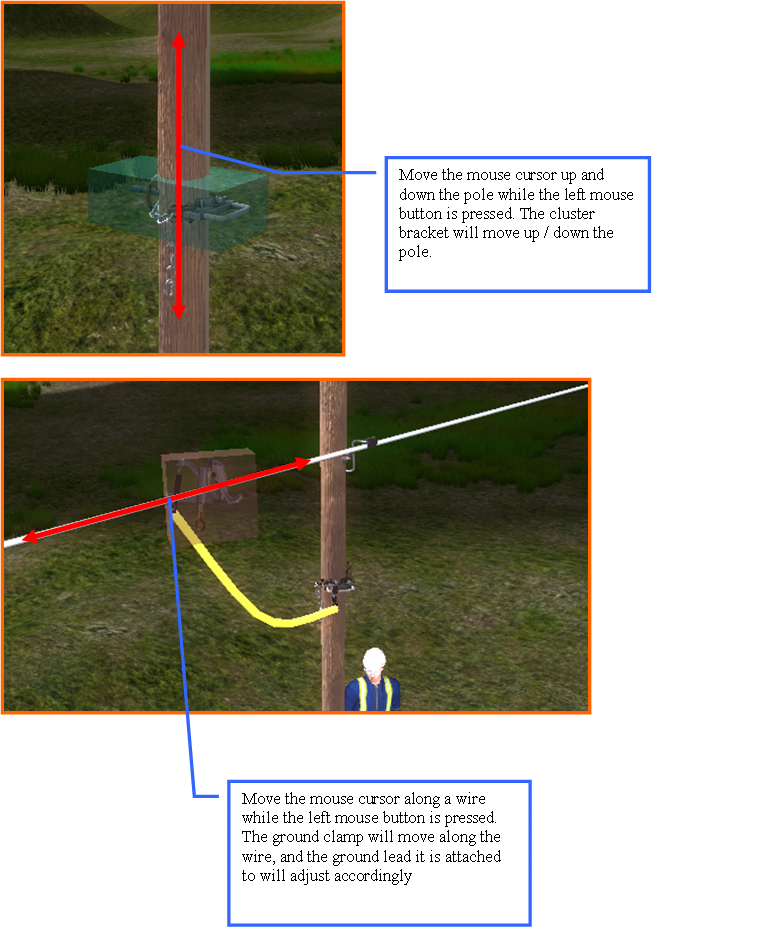
Click the appropriate icon within the equipment control window to change the current mode. The current mode will always be highlighted in purple. In the screen-shot above, the current mode is view mode. In this mode, equipment cannot be moved or rotated. To move equipment ensure the move icon is highlighted in purple, then position the mouse cursor over the equipment to move. The equipment will become highlighted in a transparent glowing box. In the screen-shot below, the mouse cursor has been positioned over a cluster bracket. Press and hold the left mouse button, then move the mouse cursor to a different location on the pole. The cluster bracket will slide up / down with the mouse cursor. The same steps can be repeated when sliding a tie-off rope up / down a pole.
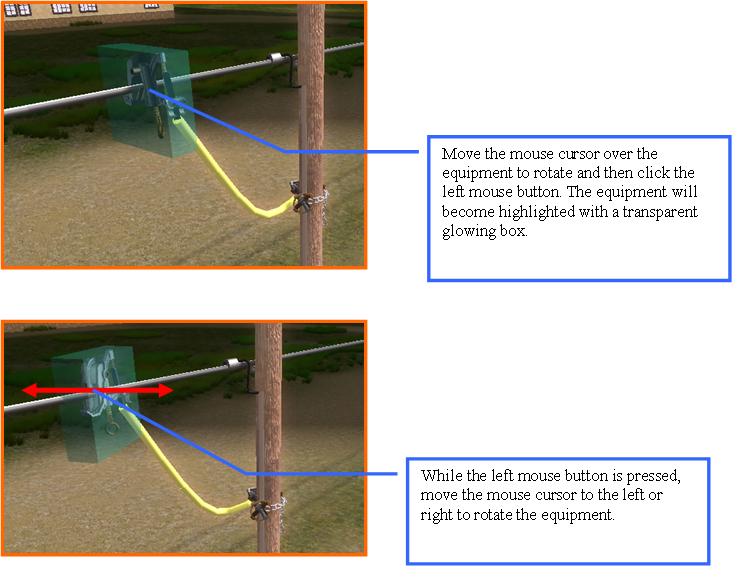
To rotate equipment ensure the rotate icon is highlighted in purple, then position the mouse cursor over the equipment to be rotated. Press and hold the left mouse button and then move the mouse cursor to the left or right. If the mouse cursor is moved to the left, the equipment will rotate clockwise. If it is moved to the right, the equipment will rotate counter-clockwise.
H. Tool Box
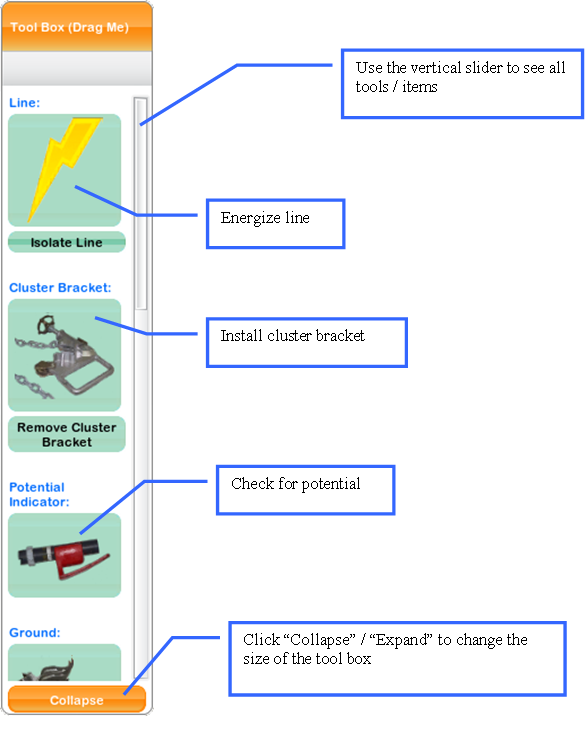
The tool box window allows the user to select which tool they would like to use. It also allows the user to place work gloves / high voltage rubber gloves on the avatar. The complete list of items available inside the tool box is:
· Energize line / line isolation
· Cluster bracket install / remove
· Potential indicator
· Ground install / remove
· Ground rod install / remove
· Move conductor
· Clear tree
· Tie-off rope install / remove
· Grounding mat install / remove
· Wear work gloves
· Wear high voltage rubber gloves
I. Action Help Window
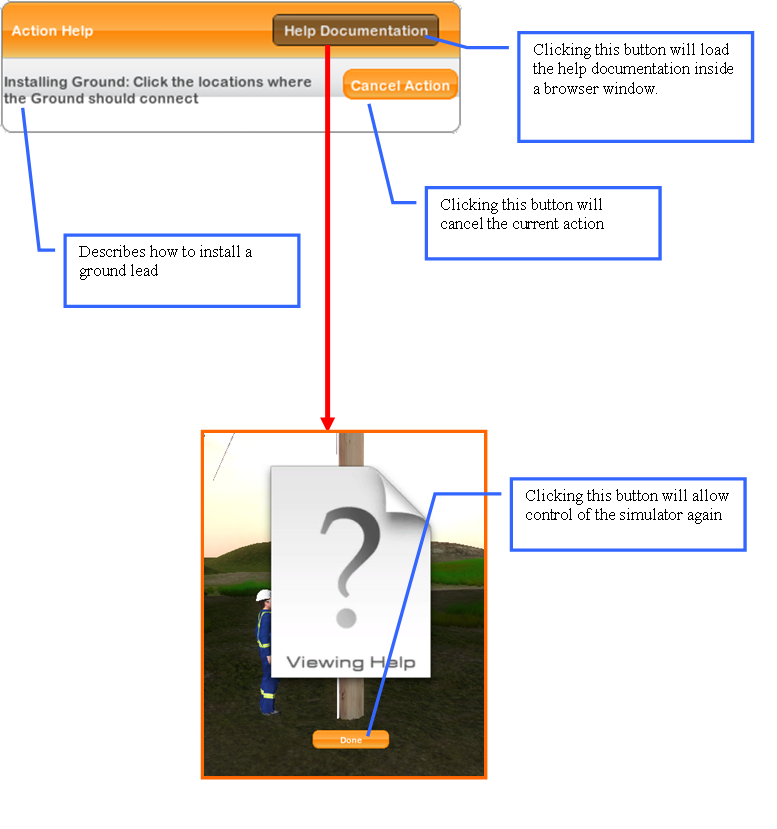
The action help window describes which tool / item from the tool box has been selected and how to use it. In the screen-shot below, the user has selected to install a ground. An action can be cancelled by clicking the “Cancel Action” button.
J. Isolating / Energizing Lines
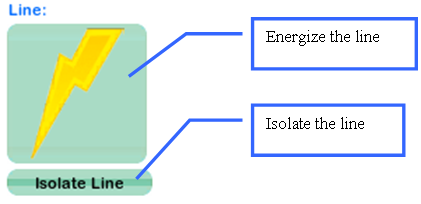
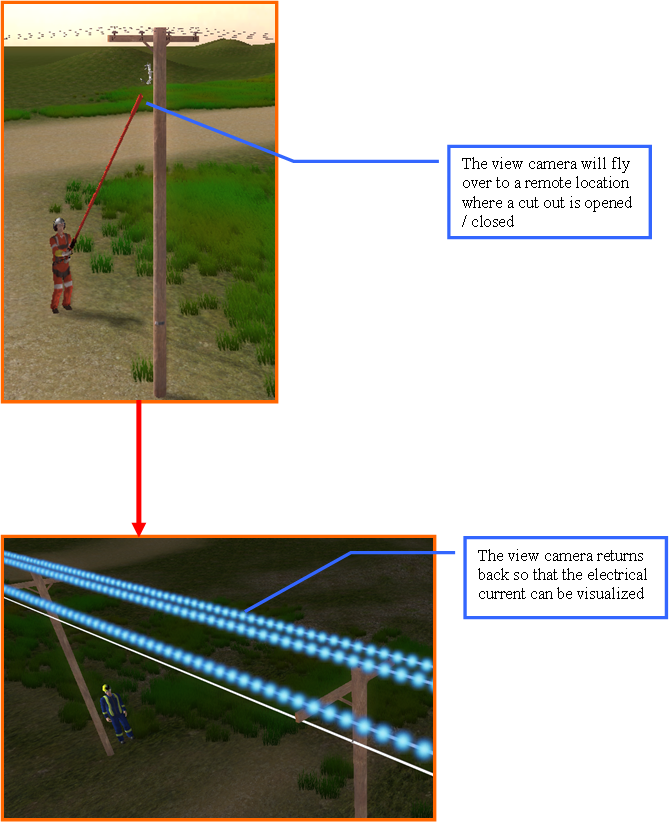
Lines can be energized or isolated. Click the appropriate item inside the tool box.
K. Cluster Brackets
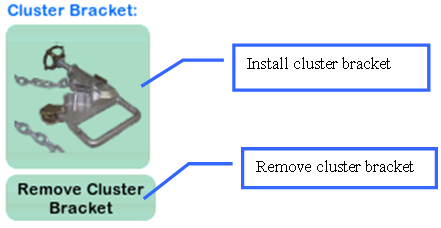
Cluster brackets can be installed or removed. Click the appropriate item inside the tool box.
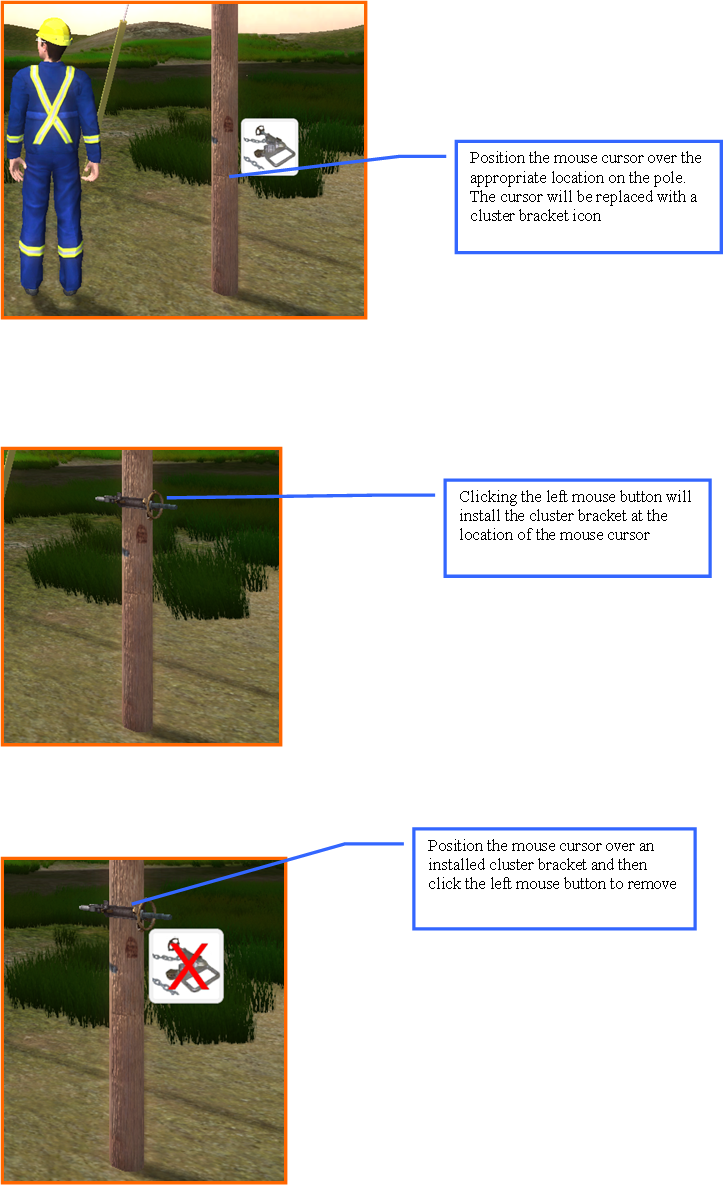
To install a cluster bracket select the install cluster bracket item, and then position the mouse cursor over the location on a pole where the cluster bracket should be installed. Click the left mouse button to install the cluster bracket at that location. To remove a cluster bracket select the remove cluster bracket item, and then click the left mouse button to remove the cluster bracket.
L. Potential Indicator
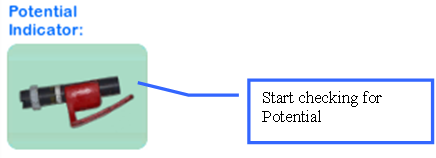
To start checking for potential click the appropriate item inside the tool box.
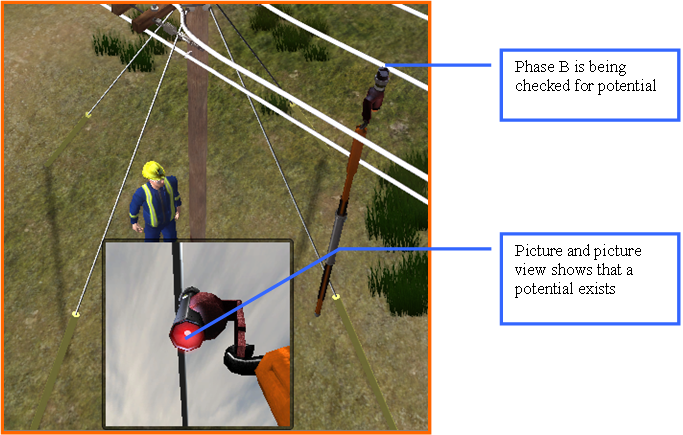
After the potential indicator item has been selected, a hot stick with an attached potential indicator will appear beside the avatar to the right. Move the mouse cursor over the wire that needs to be checked for potential. The hot stick will travel to the location to be tested. If a potential is apparent, the bottom of the indicator will glow red and a high-pitched tone will be heard. The picture in picture view showing the underside of the potential indicator, allows for easy detection of the red signal.
M. Grounds
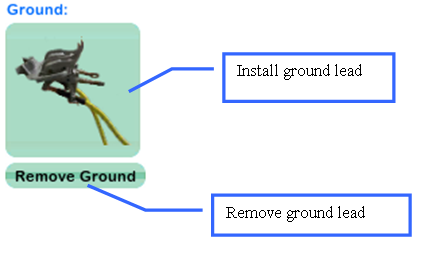
Ground leads can be installed or removed. Click the appropriate item inside the tool box.
When installing ground leads, the screen will fade to white and then change to one like the ones depicted below. The simulator will create a pair of ground clamps with a lead connecting them. A “Valid Test Date” or “Invalid Test Date” will also appear on-screen randomly. In some cases the ground clamps themselves will be in good condition, in other cases the ground clamps will be heavily corroded.
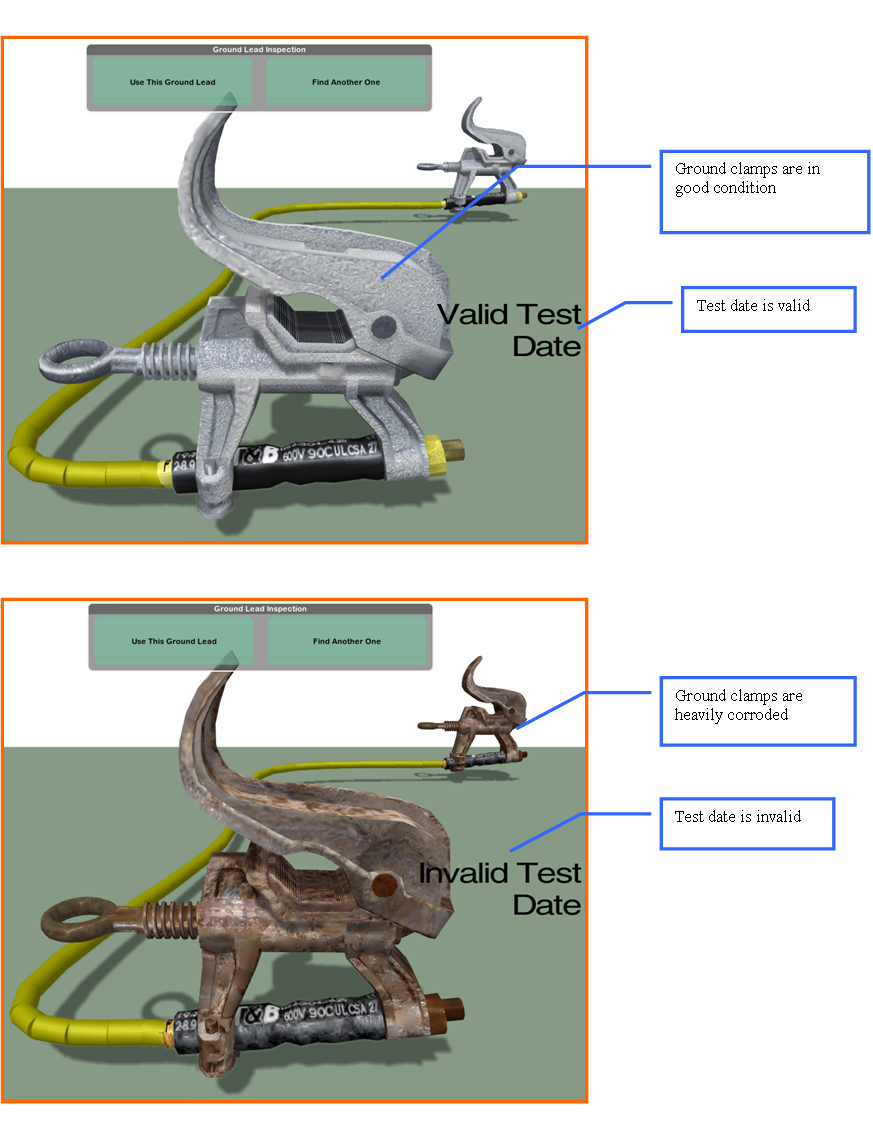
The current ground clamp setup and validation status can be changed for another configuration. This is accomplished by clicking the “Find Another One” button. When the appropriate configuration has been found, click the “Use This Ground Lead” button to return to the previous scene and start installing the ground clamps.
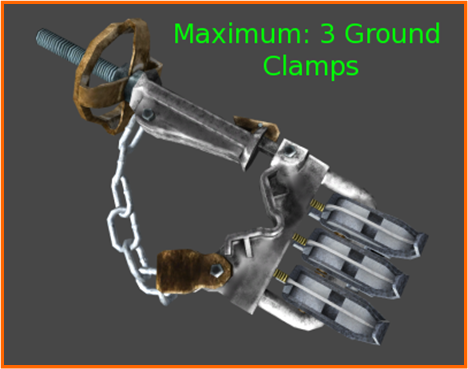
When connecting grounds to cluster brackets keep in mind that cluster brackets can only hold a “maximum” of three ground clamps. If an attempt to attach more than three ground clamps to a cluster bracket is made, the following will be displayed:
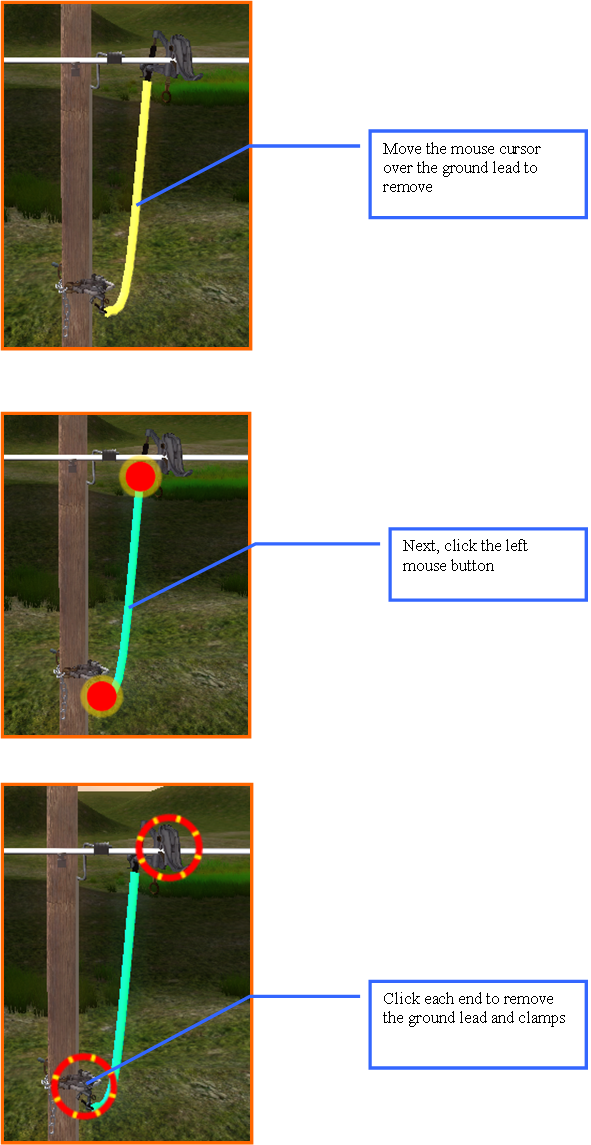
To remove a connected ground lead click the appropriate icon first, then move the mouse cursor over the ground lead to be removed and click the left mouse button. The ends of the ground lead will become focused. Once each ground lead end is clicked, the ground lead itself and its clamps will be removed.
N. Ground Rods
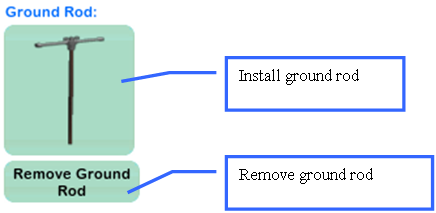
Ground rods can be installed or removed. Click the appropriate item inside the tool box.
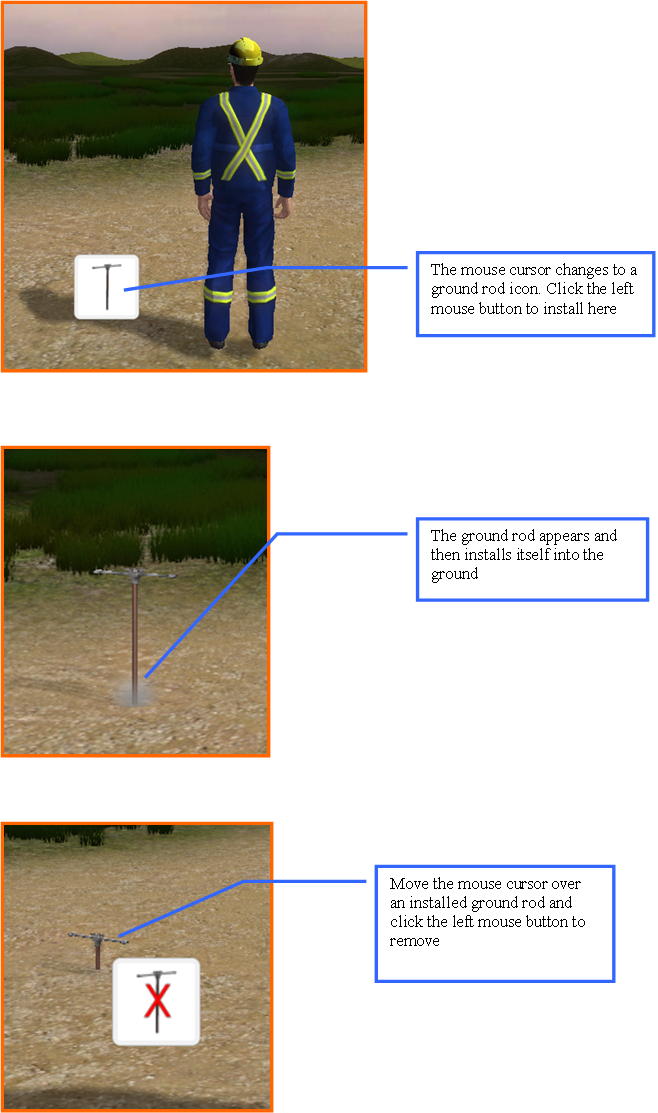
To install a ground rod, first select the install ground rod item from the tool box. Position the mouse cursor over the ground location where the ground rod needs to be installed. Clicking the left mouse button will install the ground rod into that location in the ground. The ground rod will appear, and then spin itself into position. To remove a ground rod that has been installed in the ground, select the remove ground rod item from the tool box. Position the mouse cursor over the ground rod that needs to be removed. Click the left mouse button to remove the ground rod.
O. Moving Conductors
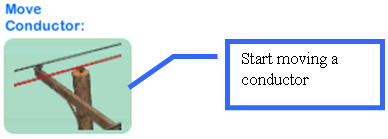
Conductors can be moved from pole to pole. Click the appropriate item inside the tool box.
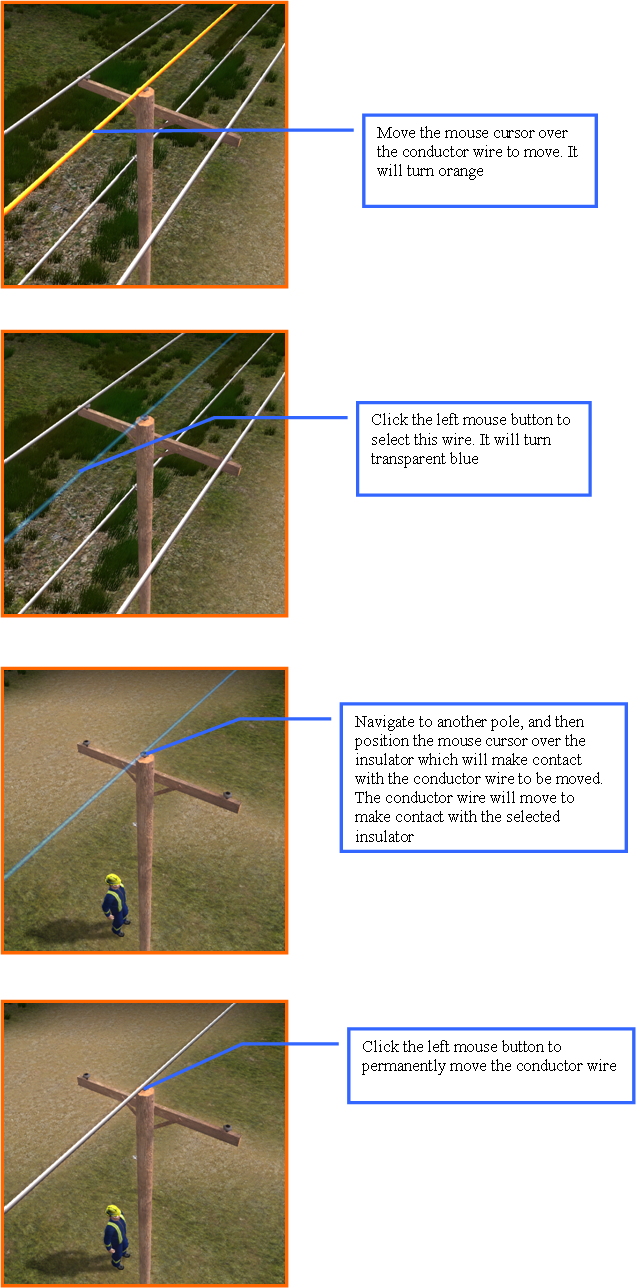
After the move conductor item has been selected, position the mouse cursor over the conductor wire which needs to be moved. The wire will turn orange. Moving the mouse cursor over another conductor wire at this time will cause the first conductor wire to revert to its original color, and the newly selected wire to turn orange. Clicking the left mouse button will fade the orange wire to a transparent blue. At this time, the new position of the faded conductor wire can be selected. Move the mouse cursor over the insulator of another pole which will make contact with the conductor wire to be moved. The faded blue wire will translate over to its new position but will remain faded. A new position can be selected at this time if required. To move the conductor wire permanently, click the left mouse button. The conductor wire will revert back to its original color and will be fixed in its new position.
P. Clearing Trees
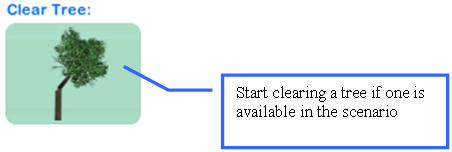
Trees that are available in a scenario can be cleared. Click the appropriate item inside the tool box.
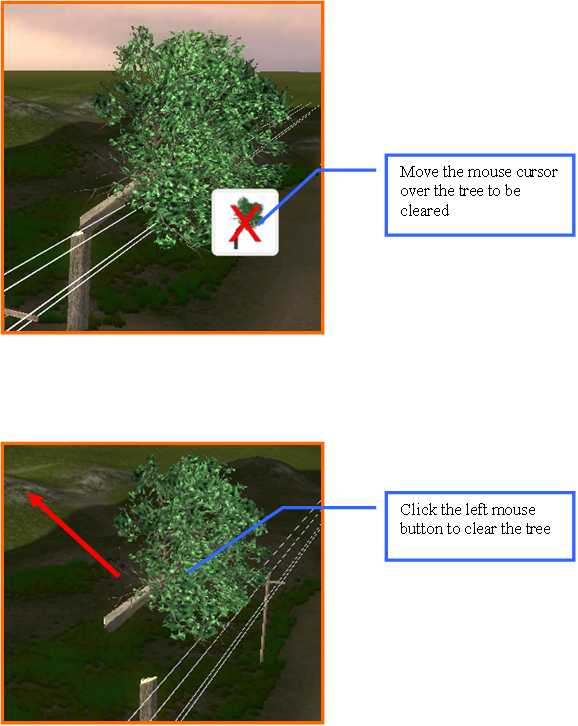
After selecting the clear tree item from the tool box, position the mouse cursor over the tree to be cleared. The mouse cursor will disappear and will be replaced with the clear tree icon. Click the left mouse button to clear the tree.
Q. Tie-Off Ropes
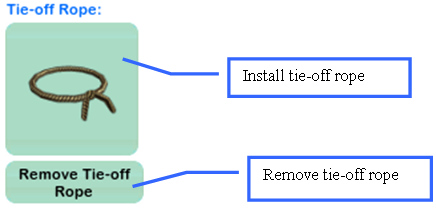
Tie-off ropes can be installed on a pole, or removed from a pole. Click the appropriate item inside the tool box.
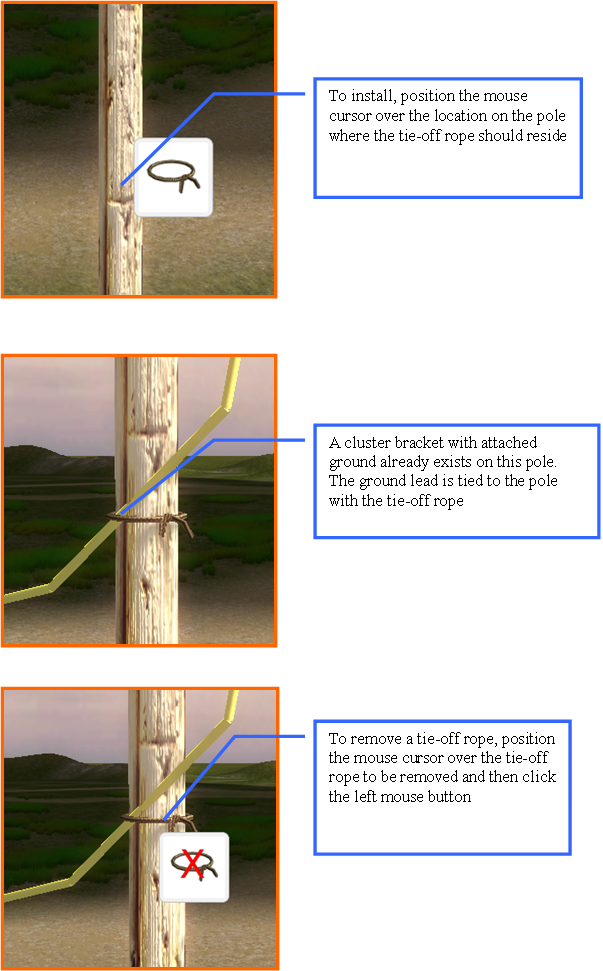
To install a tie-off rope, first select the install tie-off rope item from the tool box. Position the mouse cursor over the pole where the tie-off rope needs to be installed. The mouse cursor will be replaced with a tie-off rope icon. Click the left mouse button to install the tie-off rope at that location. If a cluster bracket with an attached ground is already installed on the same pole, the ground lead will be tied off by the rope so that it hugs the side of the pole. To remove a tie-off rope, position the mouse cursor over the tie-off rope to be removed. Click the left mouse button to remove the tie-off rope.
R. Grounding Mats
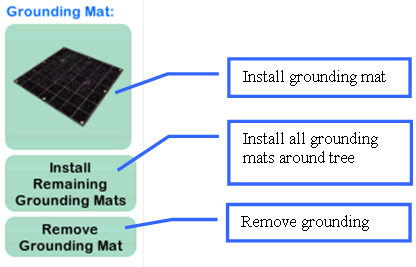
Grounding mats can be installed one at a time or all at once; they can also be removed. Click the appropriate item inside the tool box.
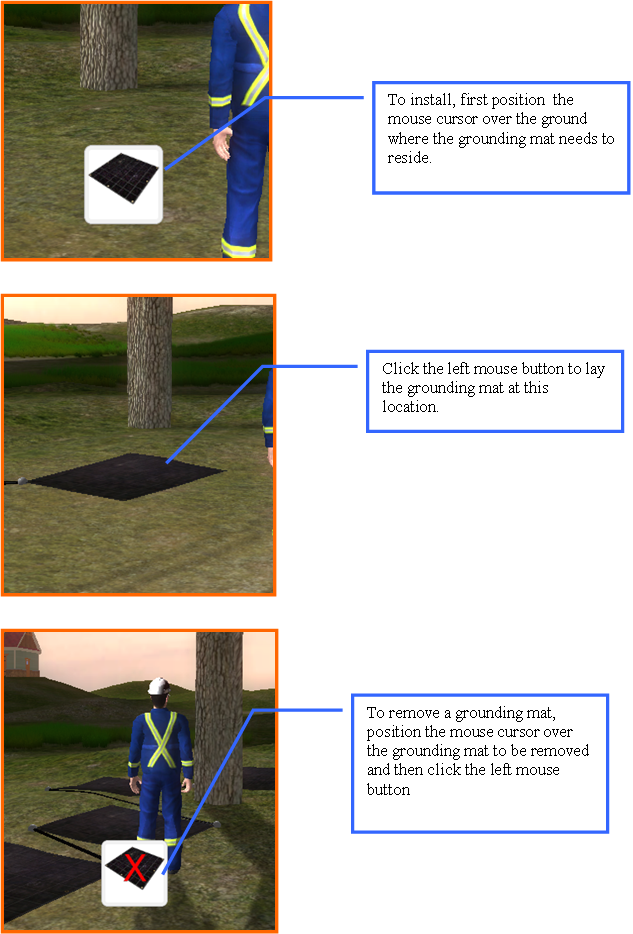
To install one grounding mat, first click the install grounding mat button from inside the tool box. Next, position the mouse cursor over the ground where the ground mat needs to be installed. The mouse cursor will change to a grounding mat icon. Click the left mouse button to install the grounding mat. To install all grounding mats around a tree, should one be available inside the scenario, click the “Install Remaining Grounding Mats” button. To remove an installed grounding mat first click the “Remove Grounding Mat” icon. Next, position the mouse cursor over a grounding mat which has been installed. The mouse cursor will be replaced by a remove grounding mat icon. Click the left mouse button to remove the grounding mat.
S. Wearing Work Gloves
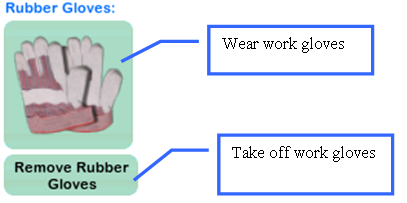
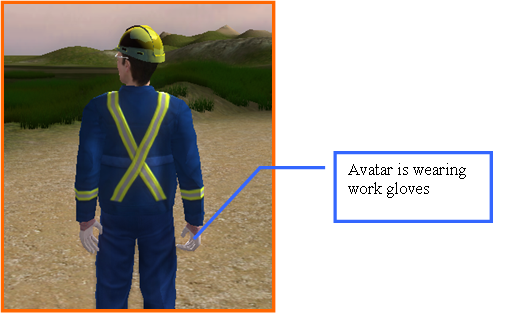
Rubber gloves can be put on or taken off. Click the appropriate item inside the tool box.
T. Wearing High Voltage Rubber Gloves
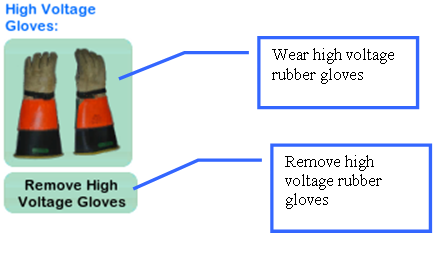
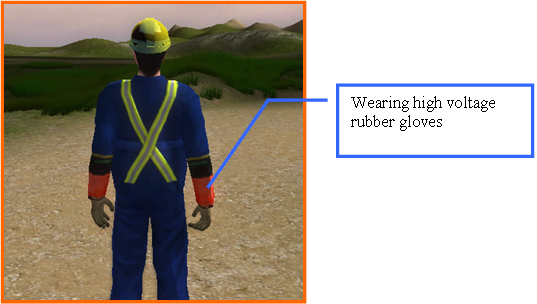
High voltage rubber gloves can be put on or taken off. Click the appropriate item inside the tool box.
II. Using the Administrative Facilities
A. Starting the Administration System
The administrative system can be executed by clicking on the start button on the taskbar, and following this sequence of menu items: Start->All Programs->3DInternet->Bonding and Grounding->Bonding and Grounding Administration
B. Logging in
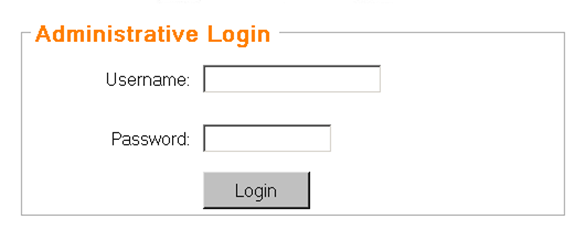
Once the administrative system has been launched successfully, the following screen will be displayed. Enter the correct username and password to continue.
C. Main Toolbar
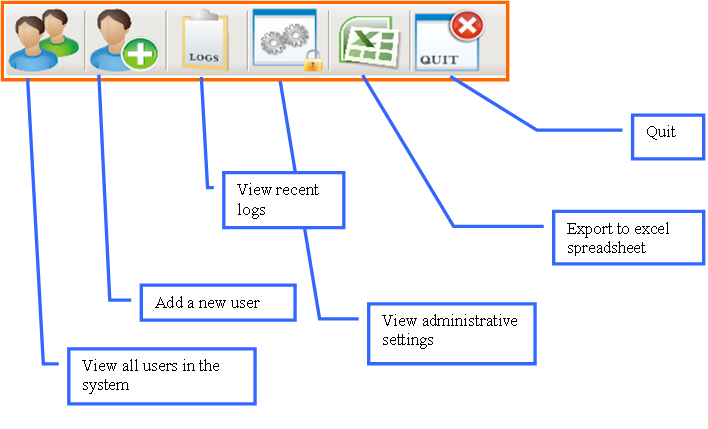
Once logged in, the main tool bar will be visible in the top area of the screen. The tool bar allows users to utilize all features of the administrative system.
D. Viewing all Users

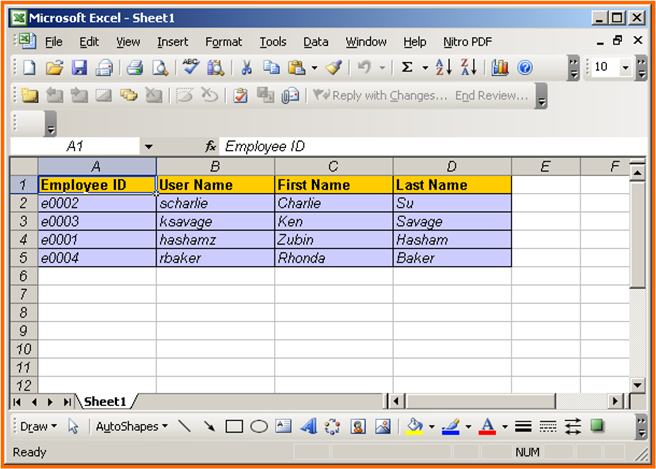
To view all users within the system click the appropriate icon on the toolbar. By default, this is the first screen that is seen directly after logging in. Various properties of each user are displayed on-screen. These include user name, first name and last name. All users are organized in a tabular display and each entry has a “View Details” button. Clicking this button allows finer details to be viewed for each user, as well as the ability to modify details.

E. Adding a User

To add a new user, click the appropriate icon on the toolbar. The following screen will be displayed:
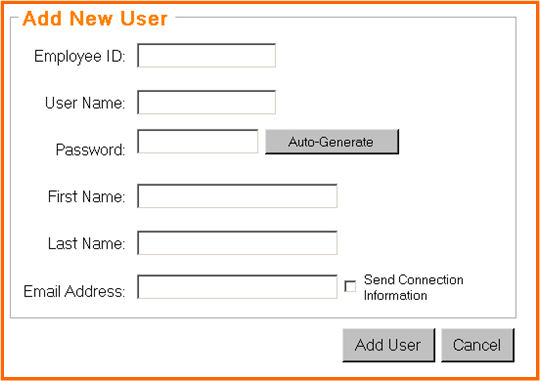
All fields are required to be filled in. The only valid characters are a-z, A-Z and 0-9. Passwords can be auto-generated by clicking on the “Auto-Generate” button. To add the new user into the system, click the “Add User” button. As an option, an email can be delivered to the user’s inbox by checking the “Send Connection Information” box. After clicking the “Add User” button, a screen will be displayed presenting the contents of the email if this box has been checked:

In the above example, the user “John Smith” is to be added into the system. Both his user name and password have been detailed automatically within the email. The contents of the email can be edited by clicking within the message, and then modifying as necessary.
F. Viewing User Details

To view a user’s details including password, make sure all users are visible on-screen. If not, click the appropriate icon on the toolbar. Then click the “View Details” button of the user you would like to view. In the example below, the “View Details” button for the user “John Smith” has been clicked:
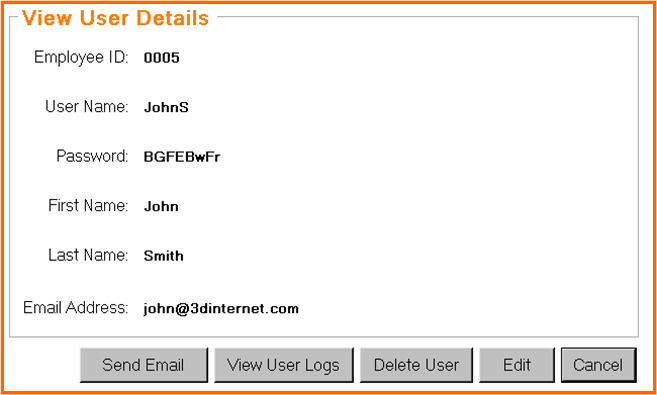
All of John Smith’s information is now visible on-screen including password. Various options are available here including the ability to delete this user from the administrative system completely. The option to send another email detailing user name and password is also accessible by clicking the “Send Email” button. To edit this user’s information click the “Edit” button. All fields will now become editable in place. Observe the screen-shot below:
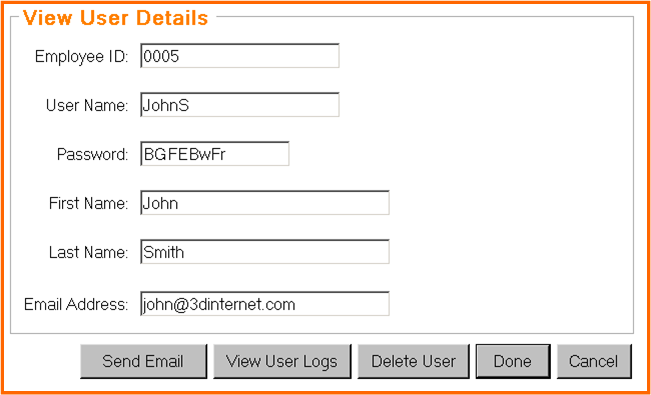
All of the above fields can now be edited. Once the desired changes have been made click the “Done” button.
G. Viewing Logs

To view the most recent logs that have been recorded, click the appropriate icon on the toolbar. All logs will be displayed in chronological order. Observe the screen-shot below:
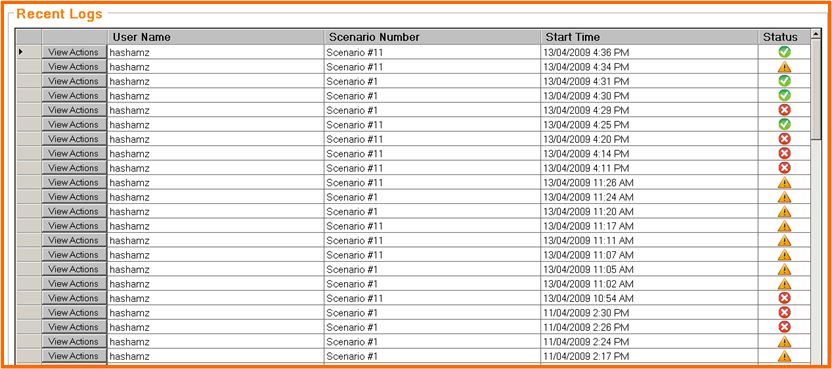
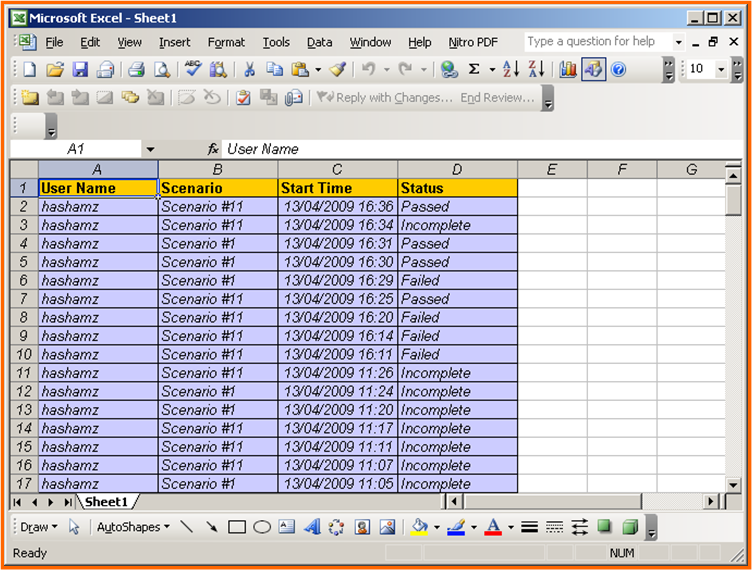
Each log is detailed as a summary in a tabular format. The user name of the person that performed the actions is detailed as well as the scenario being tested on, the start time and the status. There are three possible states for the status field – incomplete, pass and fail. If all required actions are performed correctly this will result in a pass, if not the result is a failure. When viewing logs in this manner, “all” logs recorded from “all” users are visible here in chronological order. To view the logs of a specific user, view the “details” of this user first. Then click the “View User Logs” button. The following will be displayed:

In the example above, the logs for “John Smith” are being viewed. This user has only one log stored in the System. John Smith was tested on Scenario #1 on April 14th, 2009 where he passed.
H. Viewing Log Actions
Logs consist of a series of actions which are time-stamped. Review of log actions can be very useful in determining where a power line technician is failing and if this is a common pattern among power line technicians. To view log actions, first ensure the screen being displayed provides a summary of logs in tabular format. See the section on “Viewing Logs”. Click the “View Actions” button. Observe the screen-shot below:

In the example above, the actions performed by John Smith on April 14, 2009 at 11:56am are being viewed. John successfully passed. By viewing each log action, it is apparent that this user performed all required actions and did not deviate from the correct procedure.
I. Administrative Settings

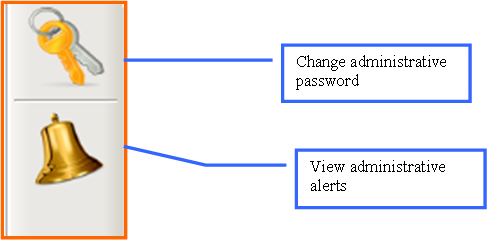
There are some key administrative settings unrelated to users and logs, which can be modified. To view these, click the appropriate icon on the toolbar.
J. Changing Administrative Password

The administrative password controls access to the administrative system. This is the password used during the “login” process. To change the administrative password click the appropriate icon within the administrative toolbar. Observe the screen-shot below:
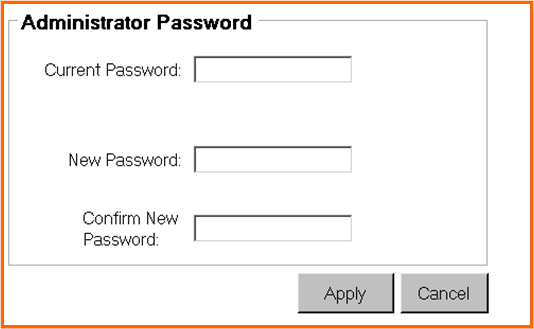
Changing the administrative password requires that the old password as well as the new one be entered. Fill in all fields and then click the “Apply” button.
K. Administrative Alerts
The Bonding and Grounding M-Learning Solution comes built with the ability for administrators to alert users. This flexible system can be useful in a variety of ways. Power line technicians may be experiencing a certain usability issue, or perhaps there is a common area where all PLTs need improvement. The alert system allows a way to notify each PLT once they have logged in via the bonding and grounding simulator. Once a PLT has viewed a posted alert, it will not be displayed to him / her again.

First, ensure that the “Administrative Settings” panel is visible. To enter into the administrative alerts panel click the appropriate icon.
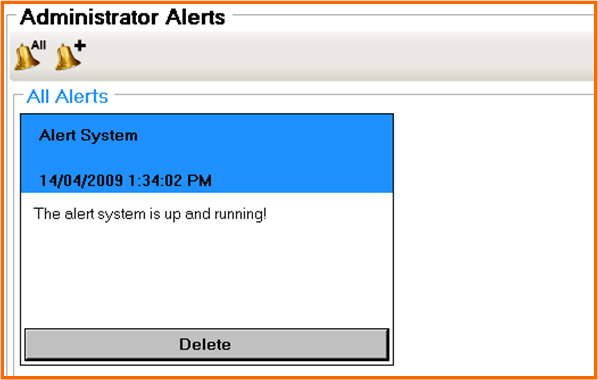
In the example above, a single alert is available in the system. Each alert consists of a title, a date and the alert message itself. To delete an alert click the “Delete” button.
To add a new alert into the system, click the icon for adding an alert:

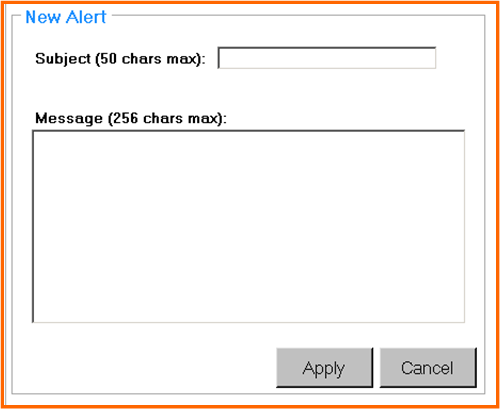
Fill in all fields and then click the “Apply” button. The new alert will be visible alongside all other alerts in the system.
L. Exporting to Excel Spreadsheets
The administrative system has the capability to export various data sets to excel spreadsheet so that they can be imported into various enterprise application systems which support excel importation. The following data can be exported to excel:
· All users
· All log summaries
· Log summaries for each user
· Log actions
While navigating through the administrative system, the icon for excel exportation will become enabled and disabled at various instances. When the icon is enabled this means what is currently being displayed can be exported to an excel spreadsheet.
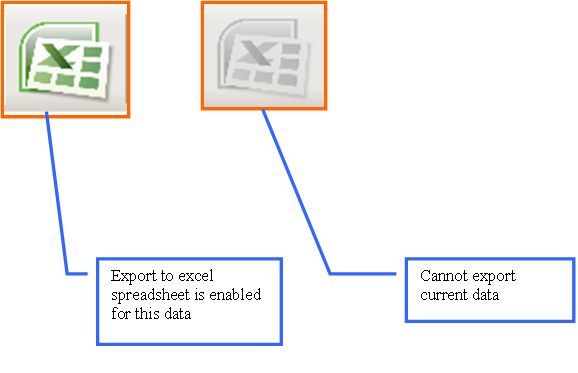
In the example below the All Users panel is being displayed. This can be triggered by clicking on the appropriate icon.


The export to excel icon will be in the enabled state. When this icon is clicked, Microsoft Excel will load in the background, and the data will be written automatically into the sheet. Once all data has been transferred, the administrative system will minimize and Microsoft Excel will be in the foreground. Using excel the data can be modified, sorted, refactored if necessary and then saved. The following shows the resulting excel spreadsheet when the export icon is clicked for the data above:
The following shows the resulting excel spreadsheet when the export icon is clicked when viewing all user logs:

III. Troubleshooting Guide / FAQ
A. Why Do I Get an Error Message When Trying To Install the Setup.msi File?
The Bonding & Grounding M-Learning Solution requires that the Microsoft .NET Framework be installed on each client machine that executes the simulator and / or the administrative facilities. If the framework is not installed, the installation will not complete. Version 2.0 or above of the .NET Framework is required and is available as a free download from here:
B. How Do I Start the Simulator?
The installation process places a shortcut onto the desktop for the simulator. Two more shortcuts are placed inside the start menu – one is for the simulator and the other is for the administrative System.

C. Why Can’t I Run Testing Mode in the Simulator?
Testing mode requires a username and password for authentication. Each user to be tested should have their details inserted into the system database using the Administrative Facilities. If the following image is seen at any time, the connection to the remote database has been severed or was non-existent to begin with.

The remote database itself is being hosted on 3DInternet servers, therefore a connection to the “Internet” is required and not just a connection to the Local Area Network. The simulator consumes a webservice which is being hosted on an IIS Server on standard port 80. The easiest way to see if a connection to the Internet is available, is to open up a browser and navigate to a popular URL such as http://www.google.com
If the webpage does not load, several things could be causing this:
1. Check to see if the LAN cable is plugged in
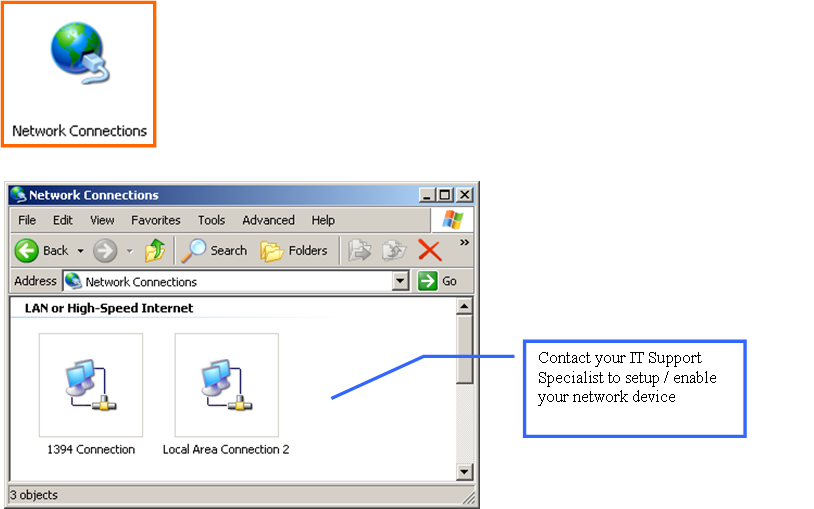
2. Ensure that your network device is enabled and properly configured
a. Double-click the “Network Connections” icon inside the Control Panel
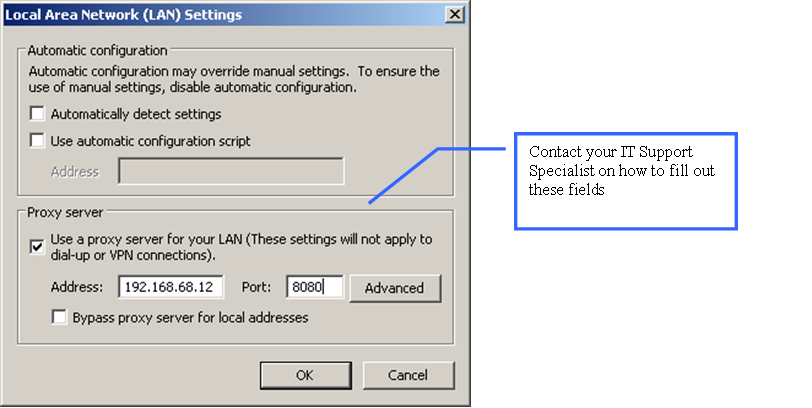
3. If you are behind a proxy, ensure that these settings are properly configured inside Internet Explorer.
a. Click Tools -> Internet Options
b. Select the Connections tab
c. Click the “LAN Settings” button
4. Ensure that the firewall is not blocking on port 80
D. Why Can’t I See Shadows in the Simulator On This Machine?
Not all graphics cards have the ability to compute shadows in real-time. If your graphics card does not support real-time shadows, then none will be seen inside the simulator. Shadows may not be visible even if your graphics card DOES support shadows. The simulator has been programmed to automatically turn off shadow computation on those machines that have less than 128 MB of video memory. Shadow computation involves lots of processing and can affect the number of frames per second seen on-screen. Low frames per second can contribute to a poor user experience which is why the simulator will only allow shadow computation on those machines that have the capability to do so, and also have 128 MB or above of video memory.
E. Why is the Simulator Slow and Jerky?
Many factors can cause the slow performance of a simulator. The key factors are:
1. Graphics card GPU including available video memory
2. CPU speed
3. System memory (RAM)
Always ensure that when running the simulator there are no other “heavy” processes running concurrently in the background pulling away system resources. Only ever run a single instance of the simulator at a time.
F. What is the Username and Password for the Administrative System?
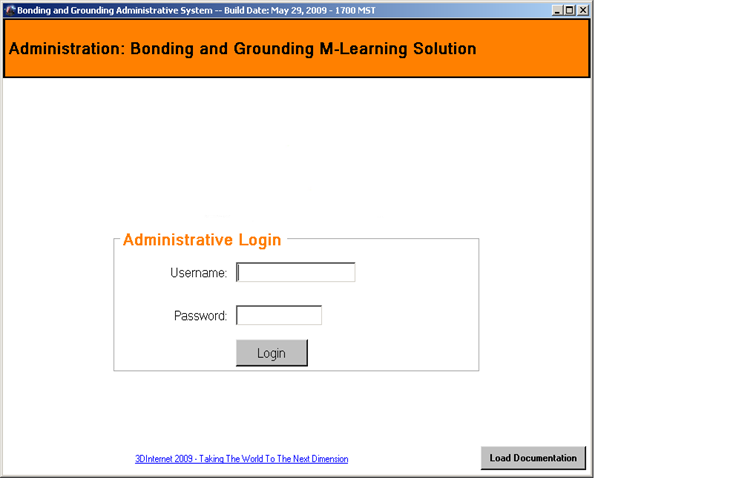
The username and password will only be distributed to authorized personnel and is not documented. To acquire this information contact 3DInternet.
3DInternet
(403) 250-5813
1 – 800 – 442 – 5299
G. How Do I Uninstall The Software?
The Bonding & Grounding M-Learning Solution can be removed through the Control Panel:
1. Open the Control Panel
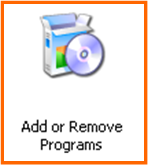
2. Double-click the “Add or Remove Programs” icon
3. Select the Bonding and Grounding M-Learning Solution from the list of programs
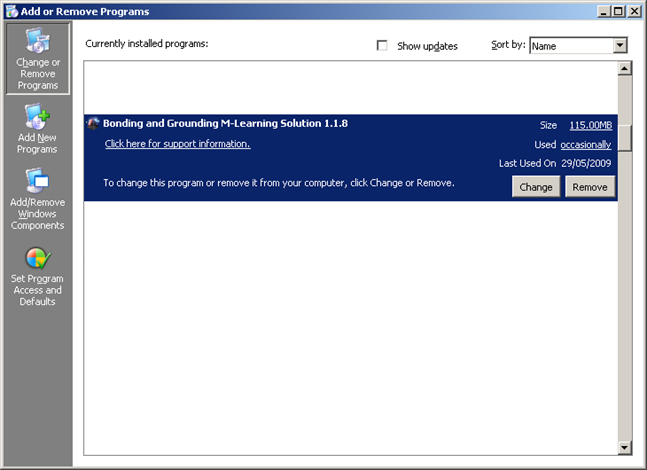
4. Click the “Remove” button and follow the prompts
IV. Installation Guide
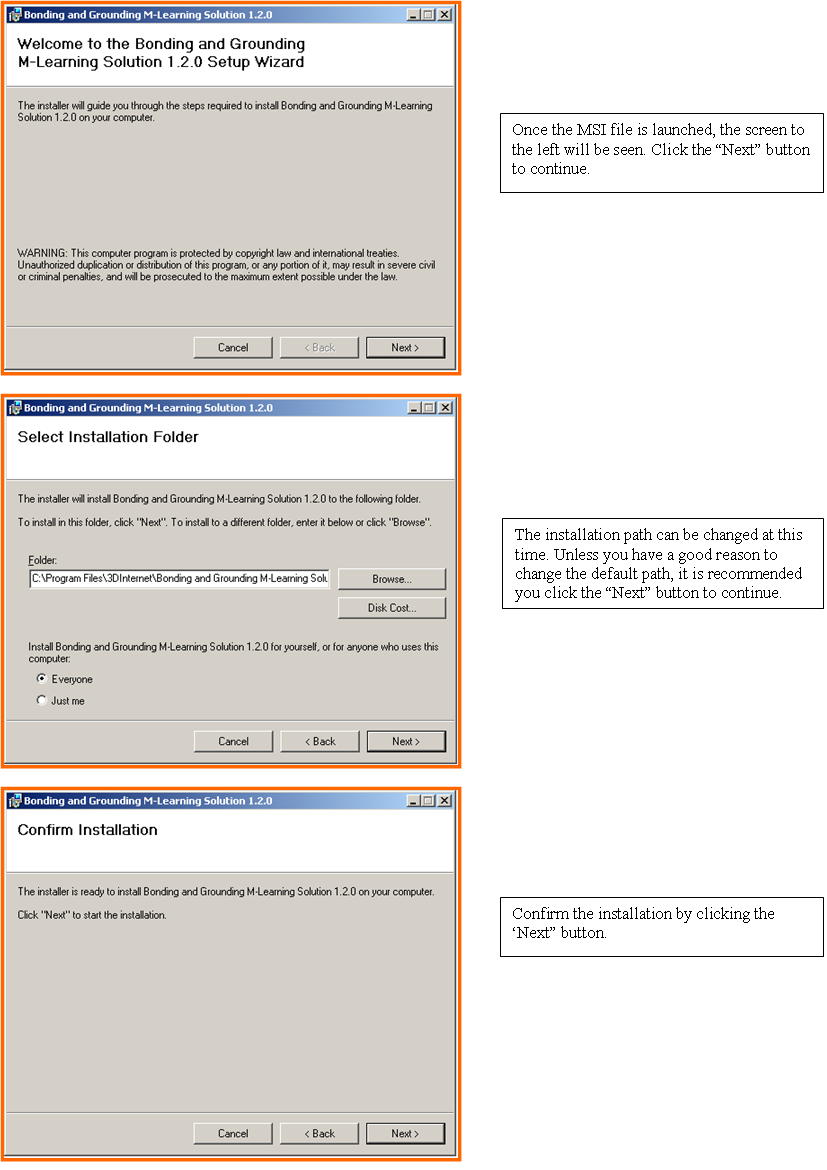
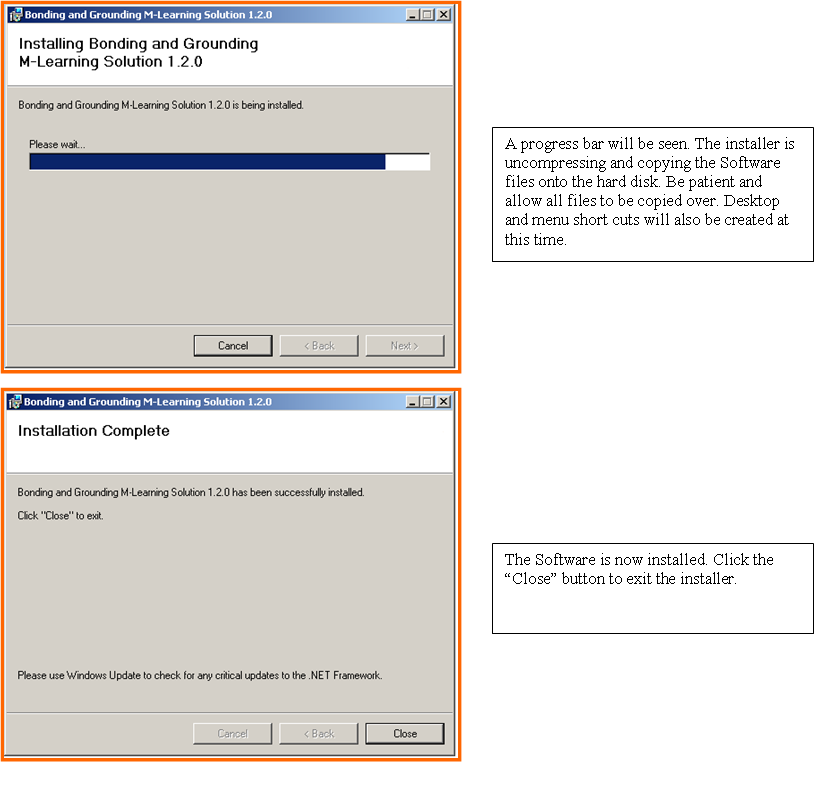
The Bonding and Grounding M-Learning Solution can be installed onto a Window’s machine via a standard Windows Installer File (Microsoft Corporation
Once downloaded, double-click the MSI file to launch the installation process.
